
Templates
We have templates for the standard print sizes and various artist alley merchandise types available for download. If your preferred size is not in our folder, you may email us for a custom size template 😀
IMPORTANT: We will not accept orders that do not follow our Filename Guide and our Templates. If you cannot do your own layouts, we offer layout services for an extra fee.
How to Use: Print Templates
- All our print templates are in PSD. Please use Photoshop or other similar tools that can read PSD files so you can open our templates.
- If you are not using Photoshop or similar tools, please check the thumbnail of our templates to see the correct dimensions in pixels for the size you want to have printed and adjust your resolution to 300dpi
- For prints, we prefer images to be sent to us as JPG/JPEG format
Our print templates each have guides inside the PSD file for you to know the correct dimensions of your file and cutting guide The guide is roughly the same for prints of different sizes.
We will be using WoL Cards as an example for how to use our print templates.
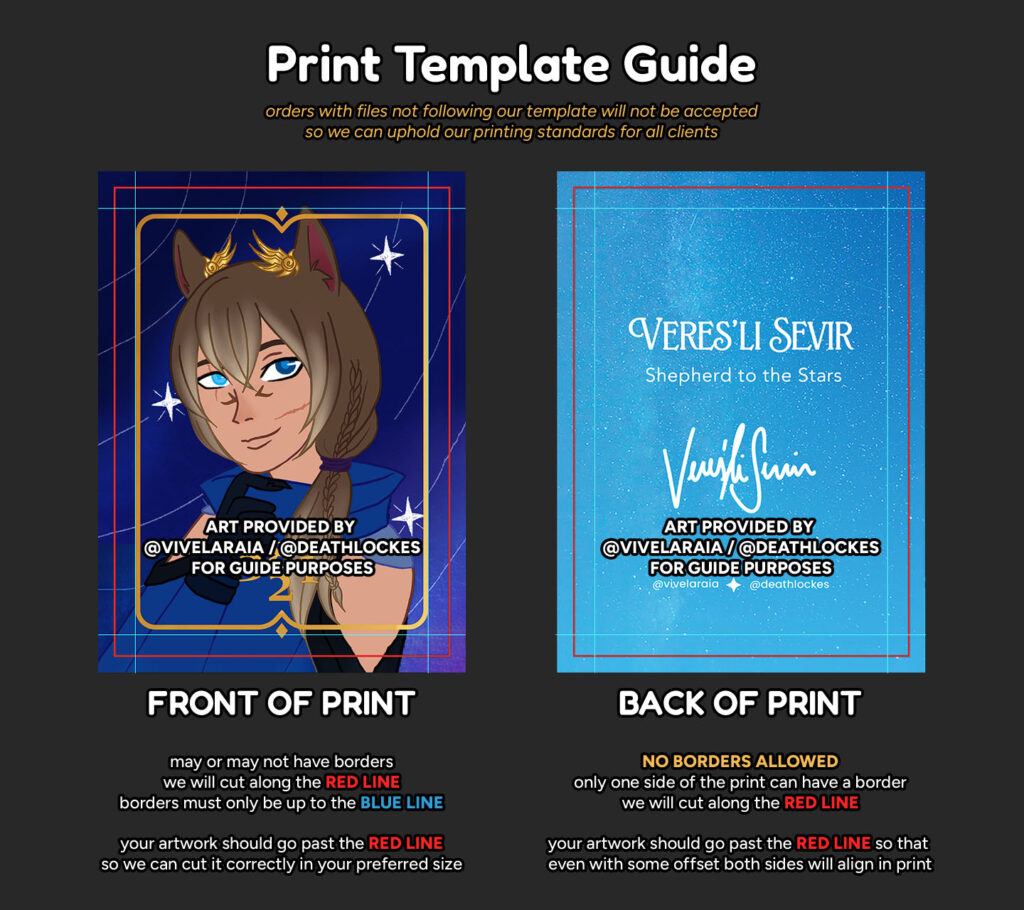
Please always extend your artwork beyond the red line!
The red line is our cut mark, meaning we will be cutting your prints along this line.
What is bleed? The part of your artwork that goes beyond our cut mark is called the bleed or allowance. This is important to have so we can cut your prints properly and you will get merch that will reflect your vision of how your artwork should look as a print!
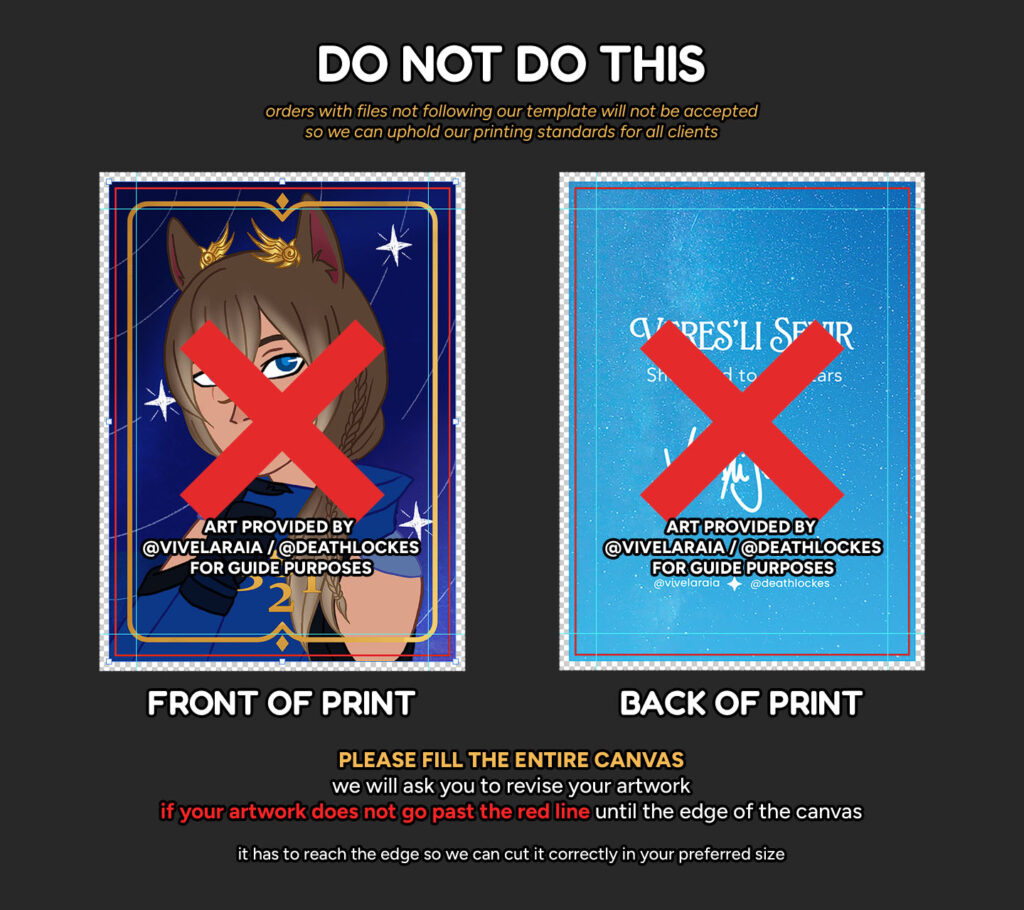
Please fill the entire canvas!
This is important especially for 2-sided prints of any size so we can cut your prints properly! If not followed, the cuts may leave white edges on your prints and we want to avoid this!
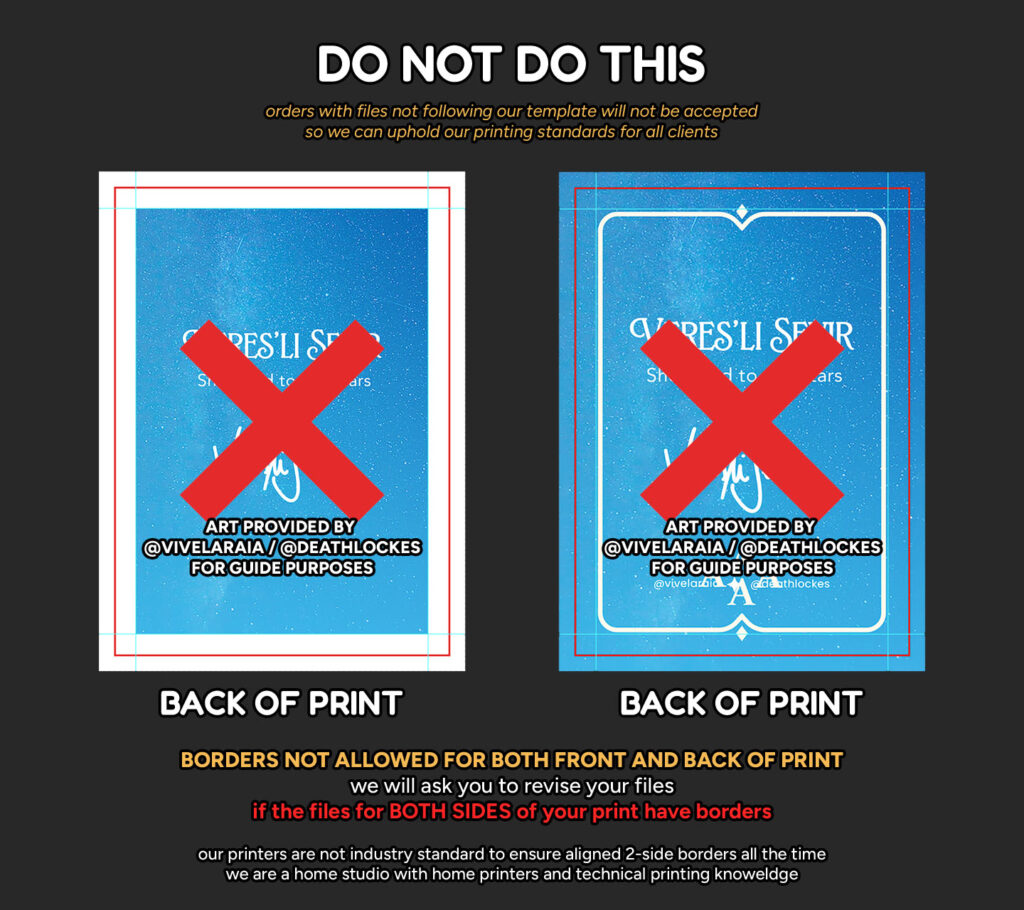
Do not put borders on both sides of a 2-sided print!
This is applicable to 2-sided prints of any size! Our printers and machines are not perfect, and we still cut prints manually. Not having borders in the back will lessen any misalignments when making your merch!
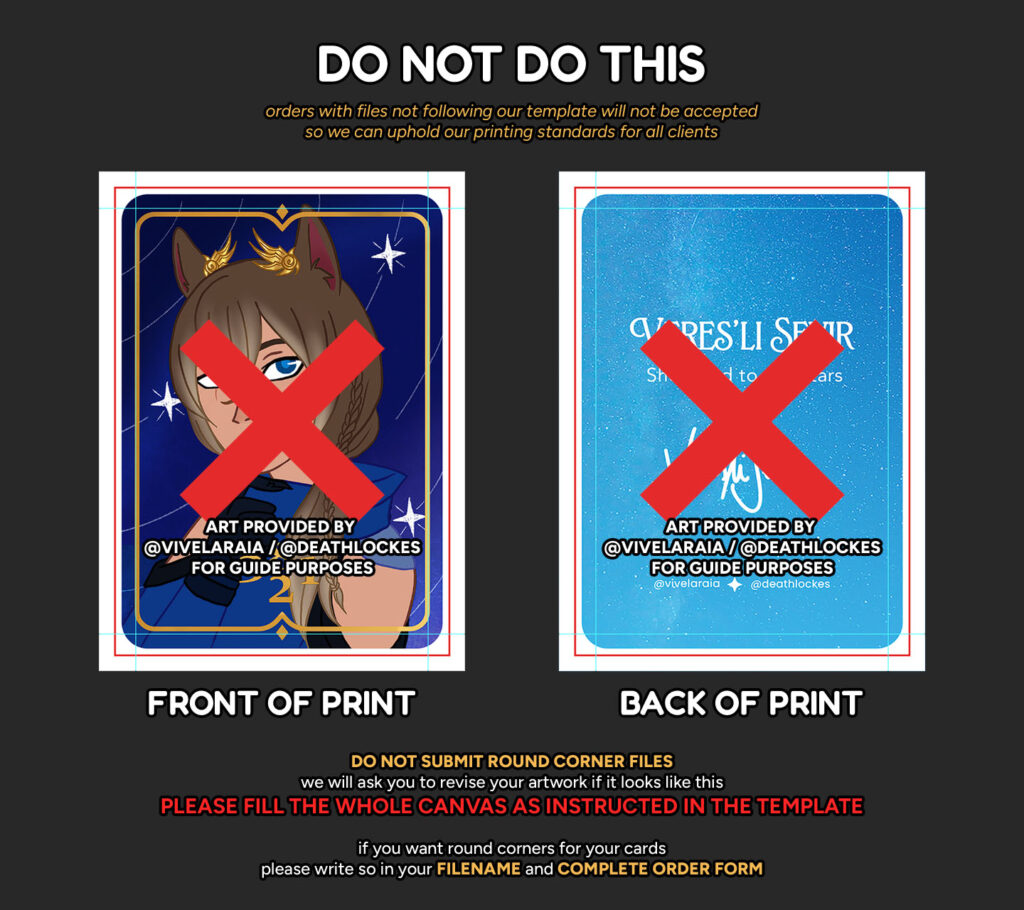
Do not submit files with rounded corners!
If you do this, your files will be printed with a white frame around it.Please fill the whole canvas! Do not make custom shapes unless you will avail machine cutting which will require a different template altogether.
Our round corner puncher has a fixed radius, and we will round corner all cards after cutting!
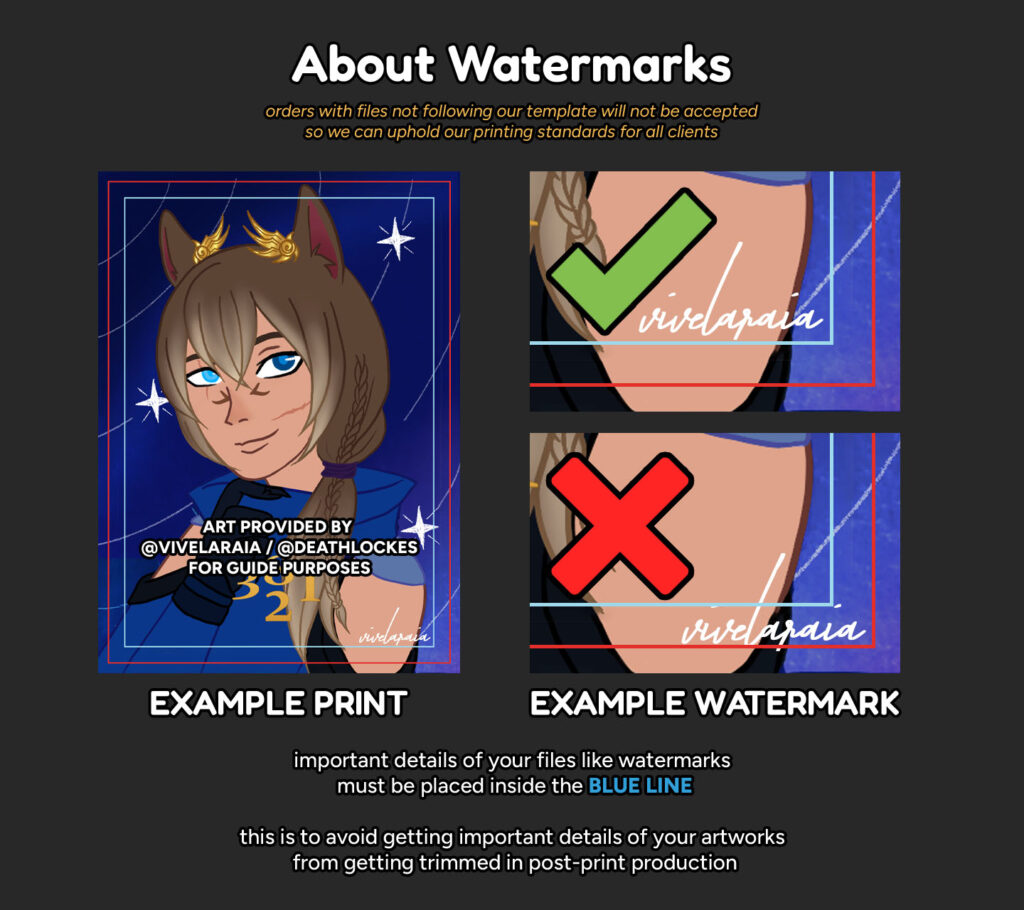
Important details of your file should go inside the blue line!
Artists usually put their watermarks at the edge of the file. Please do not do this! Make sure that the details you do not want to get trimmed are within a safe distance of the blue line.
How to Use: Sticker Templates
All our print templates are in PSD. Please use Photoshop or other similar tools that can read PSD files so you can open our templates.
- If you want custom shaped die cut prints, please also follow this guide!
Our print templates have this information written inside the PSD file to serve as your guide. This information is the same for all sticker paper types available.
If you are not using Photoshop or similar tools, please adhere to the following instructions:
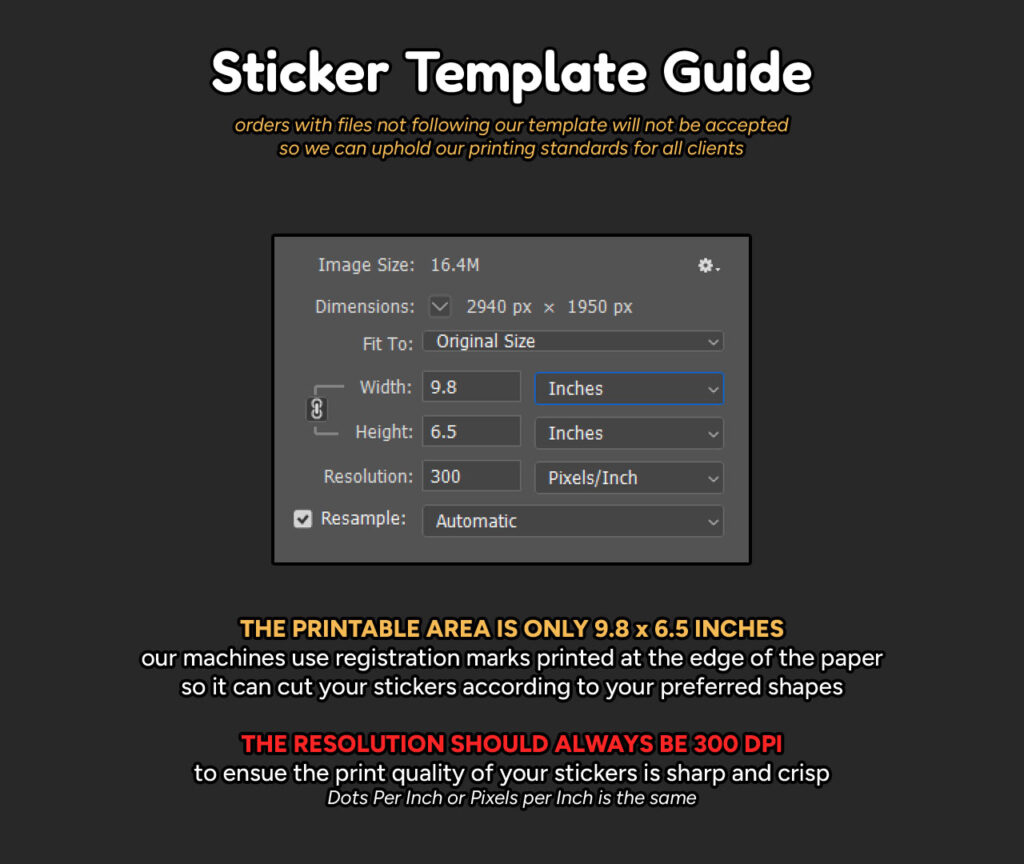
Do not send files bigger than 9.8 x 6.5 inches!
This is the printable area of our sticker papers due to requiring registration marks to cut your designs in the correct shape. If your files do not follow this size, they will have to be resized or cropped.
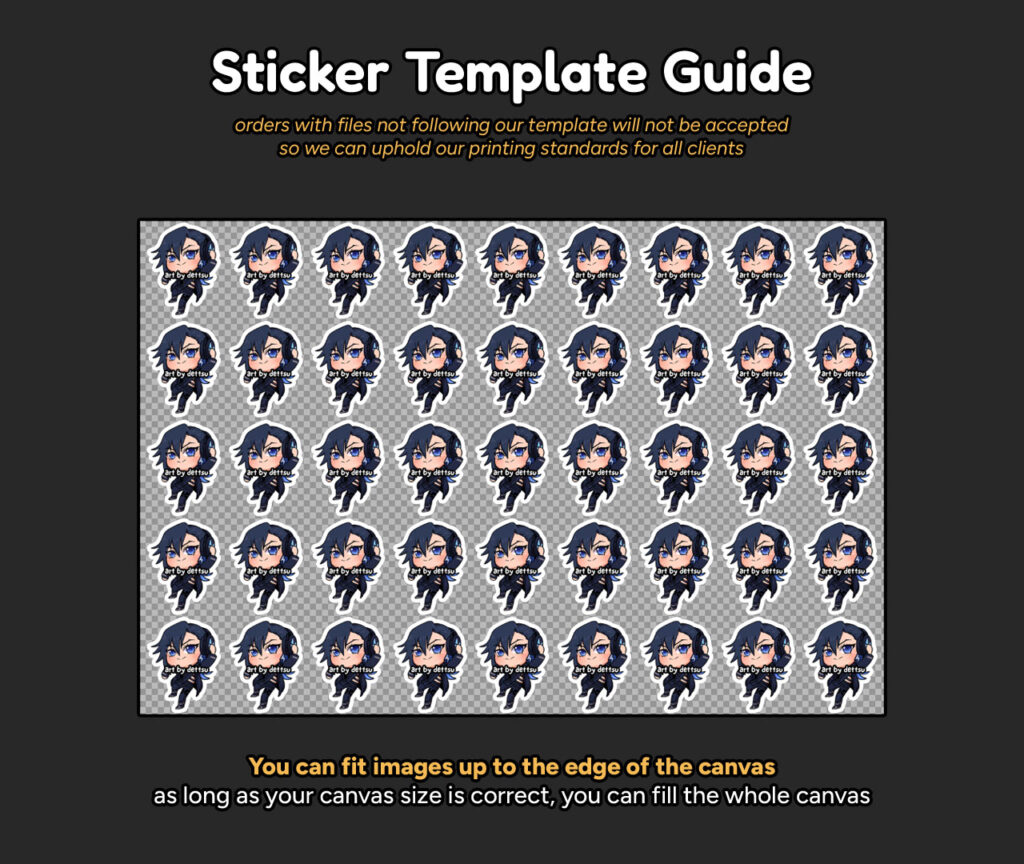
You can fill the 9.8×6.5in canvas until the edges!
Just make sure the canvas size is correct so your stickers won’t get cut incorrectly
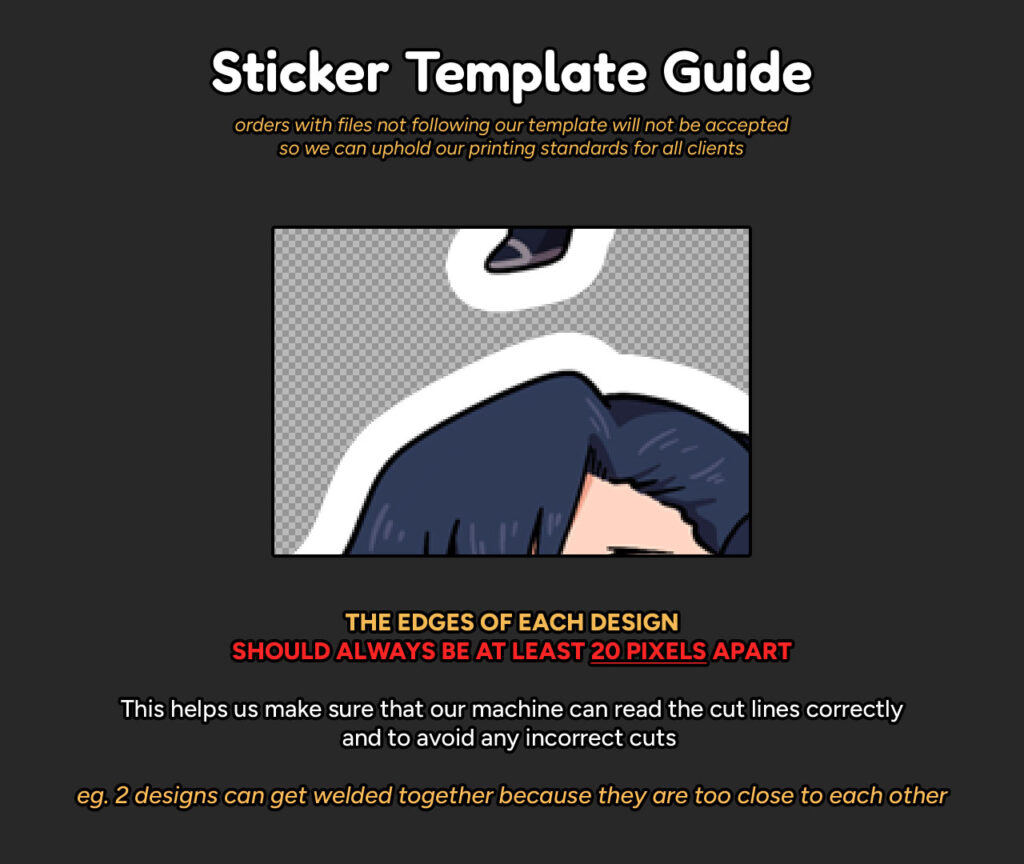
Make sure your images are at least 20px apart!
If your stickers are too close together, they will end up getting cut together into a compound shape. There has to be enough space between designs in order to make sure the machine can recognize each shape correctly!

Always send us a transparent .PNG file!
Our machine will detect the edges of the stickers as the cut line of each shape. If you submit a full image that is not transparent, the cut line will be a whole rectangle.
Always extend your artworks beyond the cut line!
The excess of your artwork serves as our allowance for cutting as the machine may offset slightly from your provided cut line file. This will help make sure that your die cut and kiss cut stickers won’t have any unwanted colors included in the final cut!
⚠ The red line is only a guide, please do not include red lines in your final files ❌
How to Use: Die Cut Sticker Templates
All our print templates are in PSD. Please use Photoshop or other similar tools that can read PSD files so you can open our templates.
Our print templates have this information written inside the PSD file to serve as your guide. This information is the same for all sticker paper types available.
If you are not using Photoshop or similar tools, please adhere to the following instructions:
- the printable area of sticker papers is 9.8 x 6.5 inchesor 2940 x 1950 pixelsonly
- please make sure that your resolution is 300 dpi
- send us your files in TRANSPARENT PNGonly
- stickers should have at least a 20px space between each other so that they can be cut properly
- if you want custom shaped die cut prints, please also follow this guide!
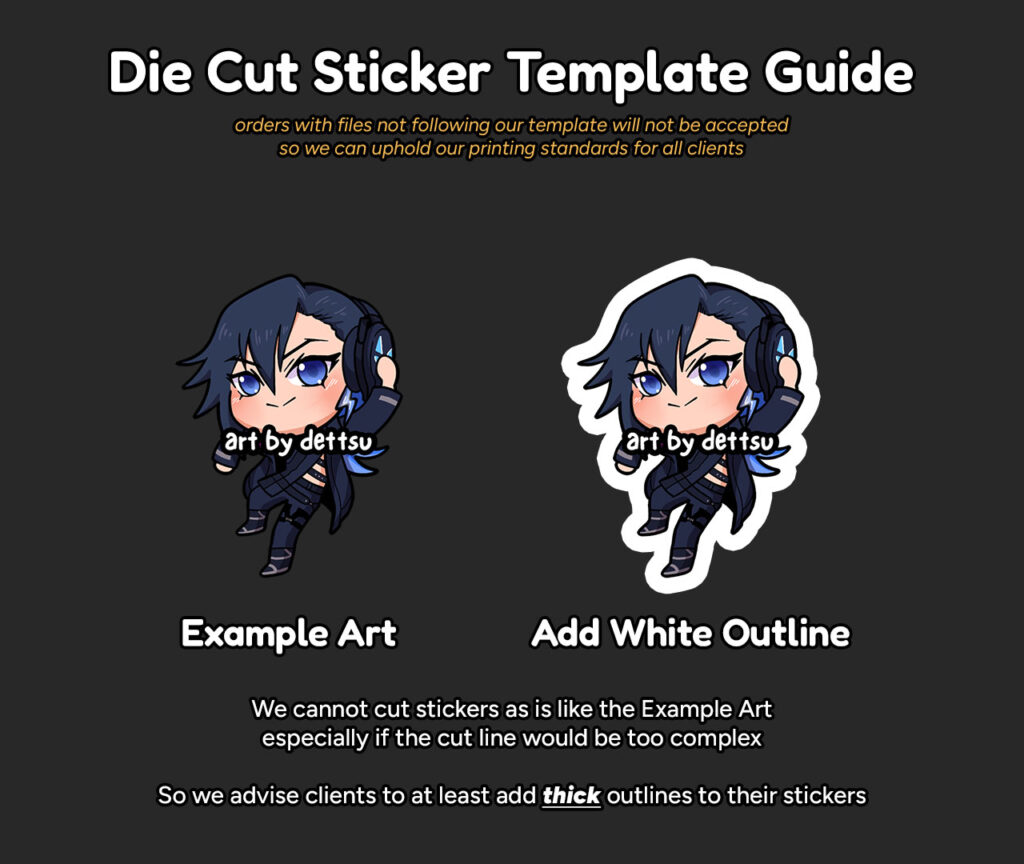
Please put an outline around your designs!
Cutting stickers directly like the Example Art above is difficult to calibrate with our current machines and will lead to several errors and paper wastage. Please put outlines around your designs so the shapes are within the technical capabilities of our machines!
For white outlines: the machine will cut around the white outline. We only need 1 transparent .PNG file per combination of designs you want to have printed and cut.
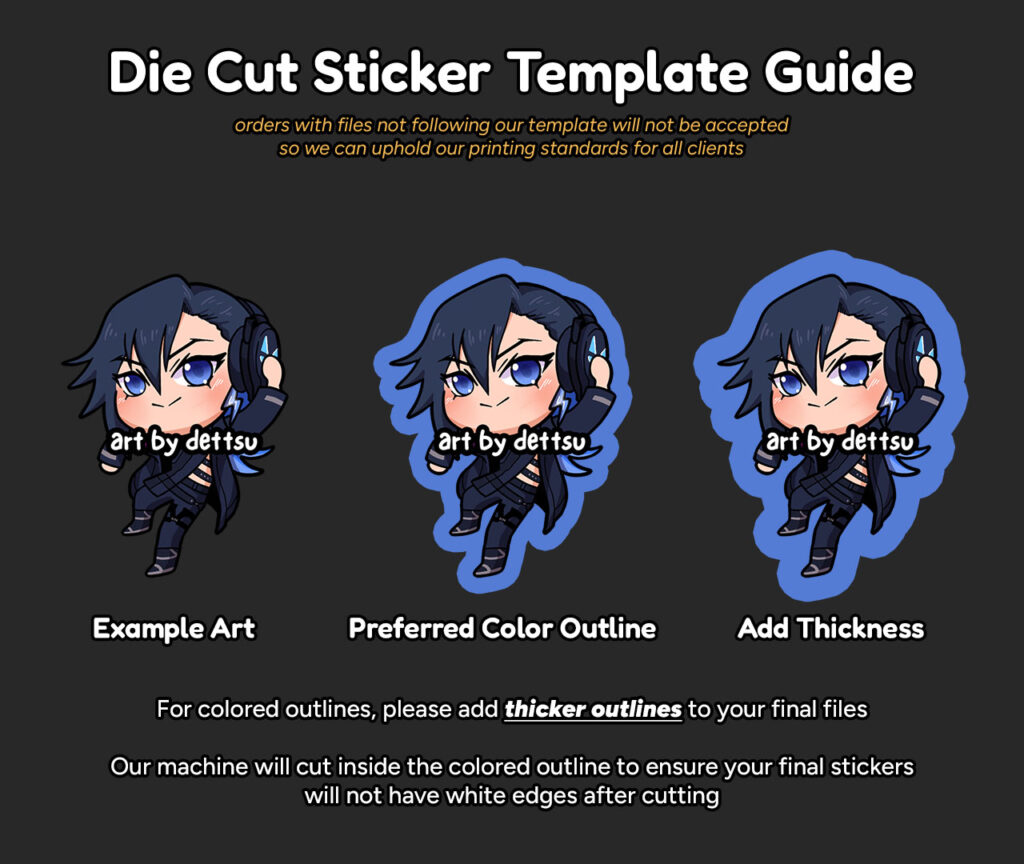
Please make colored outlines thicker!
If your preferred result is the Preferred Color Outline sticker in the middle, please add more thickness to your outline so that we have enough allowance when it comes to cutting your stickers. The excess color serves as our bleed or allowance so that when the machine cuts your stickers, there won’t be any white edges.
For colored outlines: the machine will cut inside the colored outline. We only need 1 transparent .PNG file per combination of designs you want to have printed and cut.
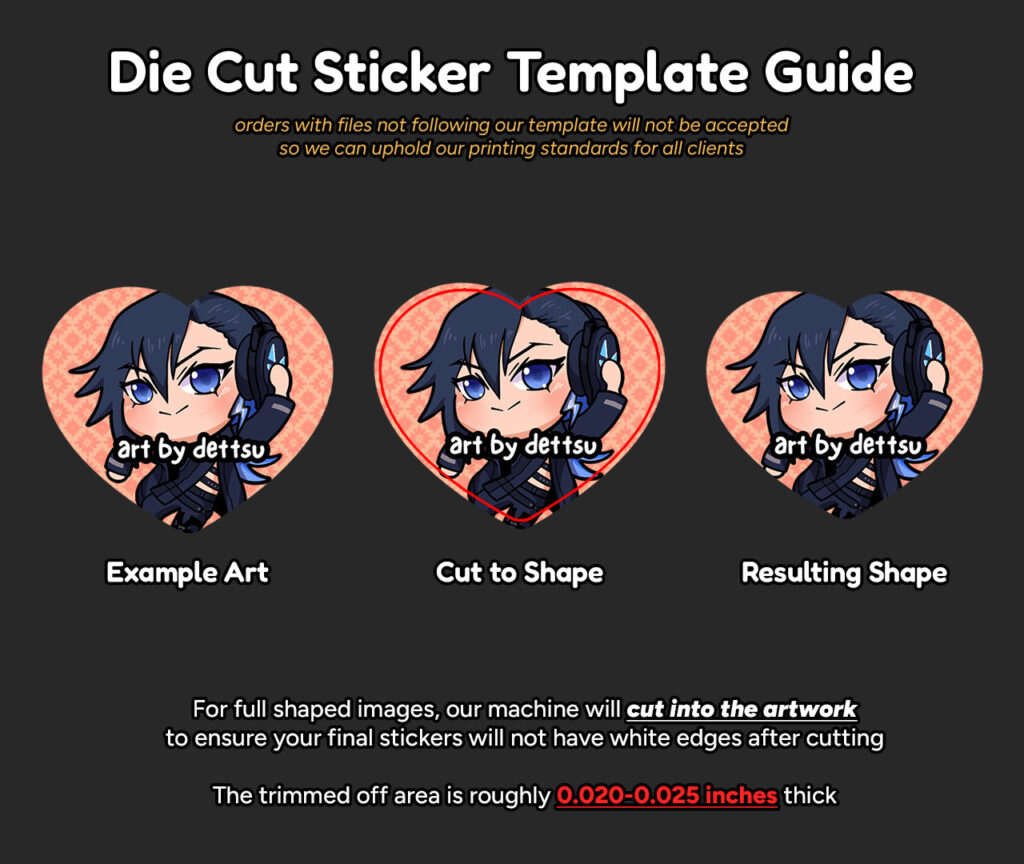
Make sure important details are away from the edges!
If your preferred result is the Resulting Shape sticker in the middle, please move all important details of your artworktowards the middle of the design to avoid getting it trimmed off. The excess color serves as our bleed or allowance so that when the machine cuts your stickers, there won’t be any white edges.
For full images in custom shapes: the machine will cut around 0.020 to 0.025 inches inside the full image. We only need 1 transparent .PNG file per combination of designs you want to have printed and cut.
Always extend your artworks beyond the cut line!
The excess of your artwork serves as our allowance for cutting as the machine may offset slightly from your provided cut line file. This will help make sure that your die cut and kiss cut stickers won’t have any unwanted colors included in the final cut!
⚠ The red line is only a guide, please do not include red lines in your final files ❌
How to Use: Kiss Cut Sticker Templates
All our print templates are in PSD. Please use Photoshop or other similar tools that can read PSD files so you can open our templates.
Our print templates have this information written inside the PSD file to serve as your guide. This information is the same for all sticker paper types available.
If you are not using Photoshop or similar tools, please adhere to the following instructions:
- the printable area of sticker papers is 9.8 x 6.5 inchesor 2940 x 1950 pixelsonly
- please make sure that your resolution is 300 dpi
- send us your files in TRANSPARENT PNGonly
- stickers should have at least a 20px space between each other so that they can be cut properly
- you must provide 2 transparent .PNG files for both the ARTWORK and the CUT LINE of your stickers
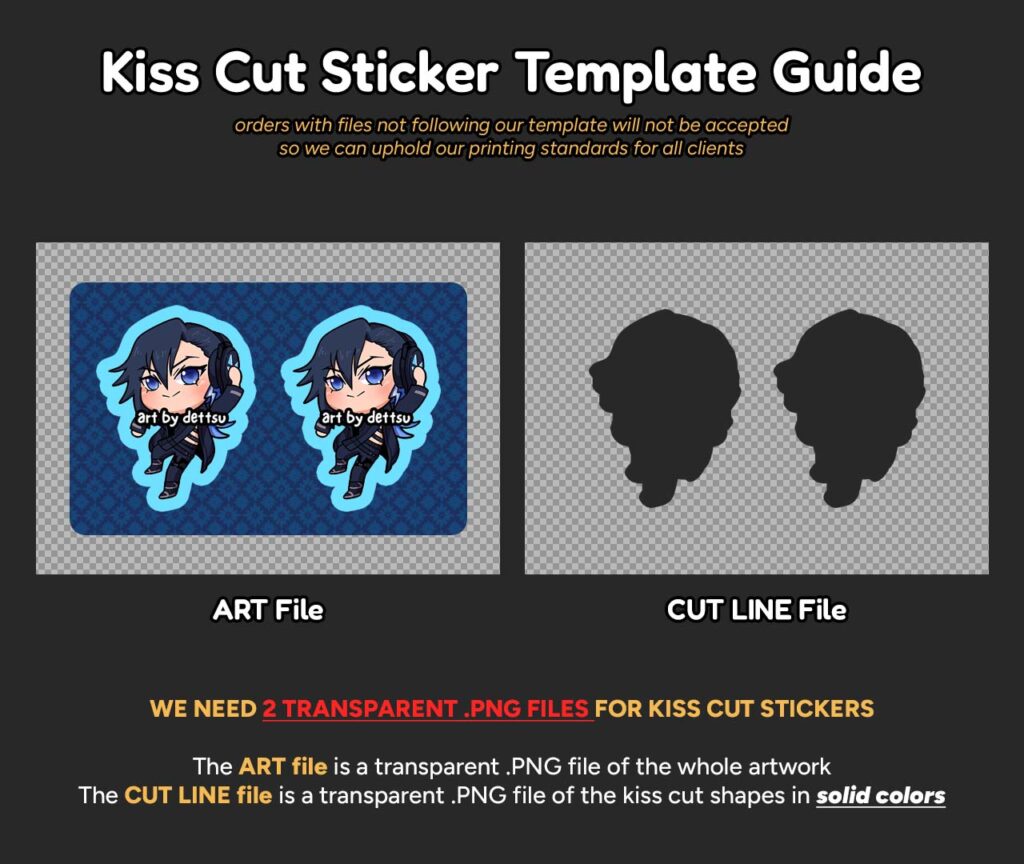
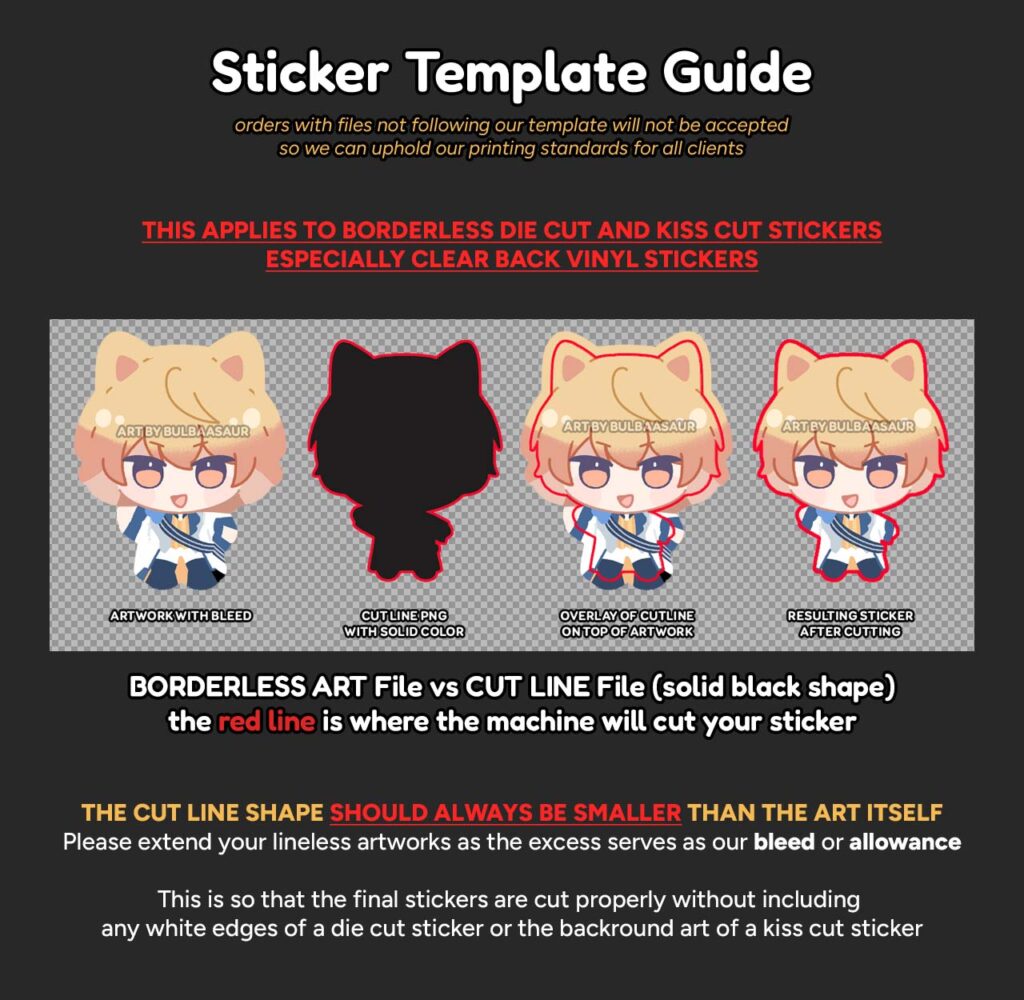
Always submit an ART file and a CUT LINE file for your designs
ART file: This is the main artwork of your kiss cut sticker. The shape of the ART file determines the shape of the die cut shape that the machine will make for the whole sticker sheet. This file should be a Transparent .PNG file.
CUT LINE file: This is the shape of the kiss cut parts of the sticker sheet based on your ART file. Please avoid using pencil-like or textured brushes when making your CUT LINE file shapes.Make sure this is a flat solid-colored shape with smooth edges and 100% opacityso that your kiss cut stickers won’t have jagged cuts. This file should also be a Transparent .PNG file.
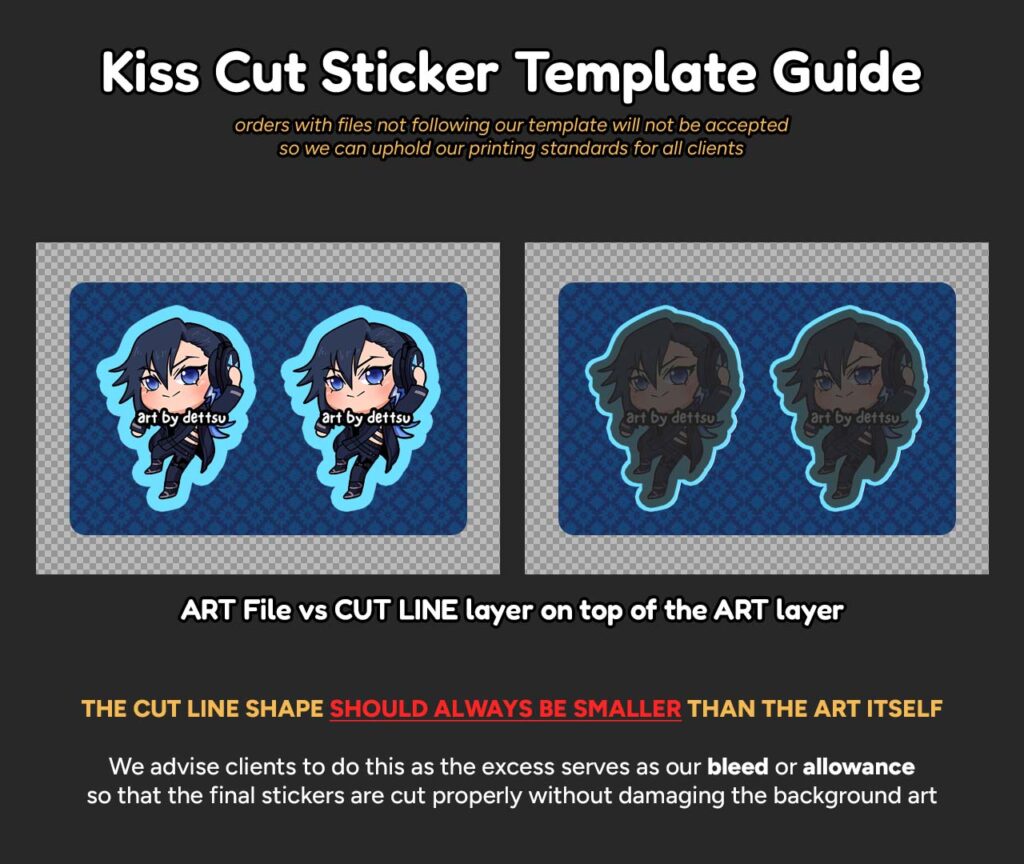
Your CUT LINE shape should be smaller than your designs
The CUT LINE shapemust be smaller than the actual design because the excess part serves as our bleed or allowance so that when the machine cuts your stickers, there won’t be any white edges and the final sticker won’t have bit of the background at the edges as well.
Always extend your artworks beyond the cut line!
The excess of your artwork serves as our allowance for cutting as the machine may offset slightly from your provided cut line file. This will help make sure that your die cut and kiss cut stickers won’t have any unwanted colors included in the final cut!
⚠ The red line is only a guide, please do not include red lines in your final files ❌